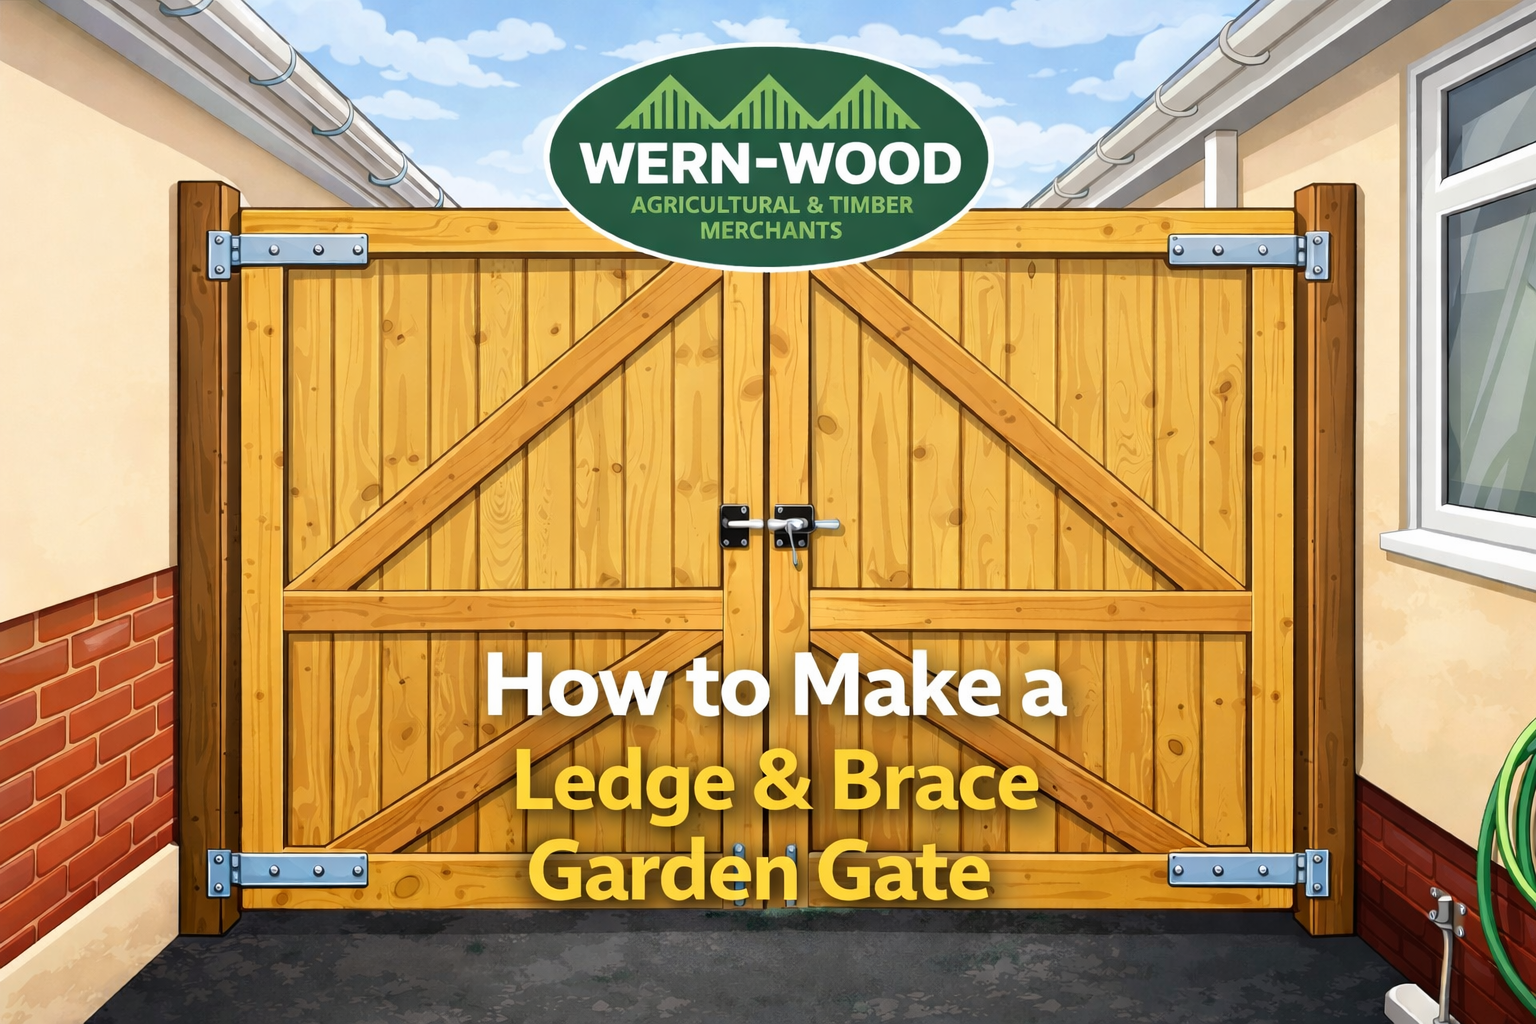
Build a Garden Gate That Doesn’t Drop After the First Winter
A good ledge-and-brace gate is not complicated, but it does need the right basics: suitable treated timber, a square layout, proper hinge fixing points, enough clearance, and diagonal braces fitted the correct way. This guide is for lightweight side gates, garden gates and shed doors. It is not for driveway gates, field gates, double-wide gates or heavy gates, which need different posts, hinges and construction.
Most homemade gates fail for boring reasons. The boards look fine, but the gate is out of square. The hinges are fixed into weak timber. The brace is fitted the wrong way. The bottom clearance is too tight. Or the gate is hung from a tired post and starts scraping before the timber has even had a full winter outside.
This guide focuses on the gate leaf itself: the timber part you build, brace and hang. We will mention posts briefly because they matter, but this is not a full gate post guide. That deserves its own article.
- 900mm x 1800mm worked example
- Side gates
- Garden gates
- Shed doors
- Ledge-and-brace construction
- Treated timber and cladding
This guide is for lightweight garden gates, side gates and shed doors. Do not use it as a design for driveway gates, field gates, double gates, wide access gates or heavy security gates. Wider and heavier gates put much more load on posts, hinges and fixings, and need a different specification.
What is a ledge-and-brace gate?
A ledge-and-brace gate is made from vertical face boards fixed to horizontal ledges, with one or more diagonal braces added to stop the gate dropping out of square. It is a simple, practical way to build a lightweight timber gate or shed door.
The ledges give the gate something solid to fix into. The braces stop the latch side from sagging. The boards create the face of the gate. Get those three parts working together and you have a gate that is much more likely to swing cleanly and stay usable.
Where this type of gate makes sense
This build works best where the gate leaf is relatively light and narrow. Think side gates, simple garden gates, bin-store gates, shed doors, outbuilding doors and small access gates between garden areas.
| Use | Suitable for this guide? | Why |
|---|---|---|
| Side gate | Yes | A 900mm x 1800mm ledge-and-brace gate is a common practical size. |
| Garden gate | Yes | Works well for lightweight garden access where posts and hinges are suitable. |
| Shed door | Yes | The same ledge-and-brace idea works well for many shed and outbuilding doors. |
| Driveway gate | No | Too wide and heavy for this basic lightweight method. |
| Field gate | No | Field gates need different construction, posts and hardware. |
| Double-wide gate | No | Needs more planning around meeting stiles, posts, hinges and movement. |
Choose the face board to suit the job
There is no single board that suits every gate or door. Match the face board to the application and the look you want.
| Board option | Best suited to | Planning note |
|---|---|---|
| Featheredge boards | Featheredge-style garden gates and fence-matching gates. | Allow for overlap. Do not calculate from total board width alone. |
| Tongue & groove cladding | Shed doors, outbuildings and neater boarded doors. | Works well when you want a cleaner, more enclosed board face. |
| Shiplap cladding | Shed doors, garden buildings and gates that match shiplap cladding. | Check board orientation so water sheds correctly. |
| Loglap cladding | Chunkier garden-building style doors and outbuilding gates. | Heavier-looking finish, so plan hinge strength and fixing carefully. |
| Gravel board detail | Lower kick board or protective bottom rail where suitable. | Useful where the bottom of the gate is more exposed to knocks, wet grass or splashback. |
For a featheredge-style gate, browse treated featheredge boards. For shed doors or outbuilding-style gates, browse treated timber cladding. For lower protection or a kick-board detail, see gravel boards.
Use treated timber for the ledges and braces
The face boards create the look, but the ledges and braces give the gate its structure. Use suitable treated timber for these parts, and choose straight pieces. A twisted ledge makes it much harder to build a gate that hangs flat.
For most lightweight gates and shed doors, use structural treated timber or suitable treated sawn timber for the ledges and braces. Avoid building the structure from weak, unsuitable or untreated timber that is not intended for exterior use.
Pressure treatment helps timber outdoors, but fresh cut ends still need attention. Where you cut treated timber, follow the product guidance and protect exposed end grain where appropriate. Gate bottoms, ledge ends and door edges are the places most likely to take on moisture.
The brace direction: the detail that stops sag
This is the part to understand before you cut anything.
When looking at the back of the gate, where the ledges and braces are visible, first decide which side will be the hinge side and which side will be the latch side. The diagonal brace should run from the upper latch side down towards the lower hinge side. That way, the brace helps transfer the dropping load back towards the hinge side.
Find the side with the hinges. The bottom end of the main brace should land towards that hinge side. The top end should land towards the latch side. If you change which way the gate hangs, the brace direction changes too.
The easy mistake is building the gate flat on the floor without thinking about which side the hinges will be on. Mark “hinge side” and “latch side” on the back of the gate before fitting the brace. That one pencil mark can prevent a gate that drops and drags.
Worked example: 900mm x 1800mm gate
This example is for a lightweight 900mm wide x 1800mm high gate. Adjust the method to suit your opening. Do not assume your opening is square or perfectly parallel.
Clearance planning
Measure the clear opening between your posts, wall faces or frame. Measure at the top, middle and bottom because openings are often slightly out. Then allow clearance for hinges, latch and ground movement.
| Clearance | Typical allowance | Why it matters |
|---|---|---|
| Hinge side | Around 10mm, depending on hinge type | Allows the gate to swing without binding. |
| Latch side | Around 10mm | Gives room for seasonal movement and latch adjustment. |
| Bottom clearance | Usually 25–50mm | Prevents scraping on paving, gravel, soil, leaves or uneven ground. |
| Top clearance | Usually around 10mm if fitting inside a frame | Useful for shed doors or framed openings. |
For a freestanding garden or side gate, bottom clearance often matters more than top clearance. Check where the gate swings, not just where it sits when closed.
Material planning method
This guide uses a material planning method rather than a fake one-size-fits-all shopping list. Board widths, effective coverage and overlap will change depending on the chosen face board.
1. Face boards
Work out the finished gate width first. Then calculate the number of boards using effective coverage, not just total board width. Featheredge boards overlap, and tongue-and-groove or shiplap boards also have a finished coverage that can differ from the full board width.
For a 900mm gate, it is usually worth allowing a little extra board material so both outside edges can be trimmed cleanly.
2. Ledges
Most 1800mm high lightweight gates should use three ledges: top, middle and bottom. Three ledges give better fixing points for hinges and latch hardware, and they make the gate more forgiving for a beginner.
Cut the ledges slightly shorter than the full finished gate width if you want the boards to overhang or trim neatly at the edges. Keep the ledges straight and parallel.
3. Braces
Measure braces in place after the ledges are fixed. Do not try to guess the brace length from a table. Offer the brace timber across the ledges, mark the angle, cut it neatly, then fit it tight.
For a 900mm x 1800mm gate, one full diagonal brace can work, but two braces between three ledges often give a neater and more controlled build. The brace direction must still support the gate back towards the hinge side.
4. Fixings
Use exterior-grade fixings suitable for treated timber. You will need fixings for attaching boards to ledges, braces to ledges, hinges to the gate, and latch hardware. Browse timber fixings, nails and ironmongery before starting.
Cutting and sanding timber can create harmful dust, especially when using power tools. Work outside or in a well-ventilated area where practical, avoid breathing dust, and use suitable eye protection and respiratory protection when cutting or sanding.
Example cut planning for a 900mm x 1800mm gate
This is not a fixed kit list. Use it to understand the layout, then adjust to your chosen timber and opening.
| Part | Planning method | Product direction |
|---|---|---|
| Face boards | Cut to 1800mm high, allowing enough boards to cover 900mm finished width after overlap or finished coverage. | Featheredge, T&G, shiplap, loglap or suitable treated cladding. |
| Top ledge | Cut to suit the back of the gate, usually slightly less than finished width. | Treated structural or treated sawn timber. |
| Middle ledge | Cut to match the top and bottom ledges. Position roughly central. | Treated structural or treated sawn timber. |
| Bottom ledge | Cut to match other ledges. Keep it high enough that it is not sitting in constant splashback. | Treated structural or treated sawn timber. |
| Diagonal brace or braces | Measure in place after ledges are fixed. Brace from upper latch side down to lower hinge side. | Treated structural or treated sawn timber. |
| Optional bottom kick detail | Use where the bottom of the gate needs extra protection from knocks, splashback or garden use. | Treated timber or suitable gravel board detail. |
Step-by-step build method
Step 1: Measure the opening properly
Measure the opening at the top, middle and bottom. Then check the height where the gate will swing. The ground may rise, the paving may slope, or gravel may build up near the opening.
Write down:
- The narrowest opening width.
- The available height.
- The hinge side.
- The latch side.
- The ground clearance needed across the whole swing.
This is not a post-setting guide, but do not ignore the posts. If the hinge post is loose, rotten, undersized or leaning, the best-built gate leaf will still drop. A full gate post guide should handle that job properly.
Step 2: Choose the gate face
Choose the boards based on the job. Featheredge suits a featheredge-style garden gate or a gate that needs to match fencing. T&G, shiplap and loglap usually feel more natural for shed doors and outbuilding doors.
Lay out enough boards to cover the finished width. Keep the best-looking boards for the most visible face. If using featheredge, keep the overlap consistent.
Step 3: Cut the face boards to height
For the worked example, cut the face boards to 1800mm. If your gate will sit above uneven ground, remember that the bottom clearance comes from the hanging position, not from cutting the boards short at random.
Keep the cuts square and tidy. If the top of the gate will be visible, this is where neat cutting makes a big difference.
Step 4: Lay the boards face down and square them
Lay the boards face down on a flat surface. Clamp or temporarily hold them so they do not creep while you work. Use a straight edge along the bottom or top to keep the board ends aligned.
If your working surface is not flat, use packers so the gate is not built with a twist from the start.
Step 5: Position the ledges
Fit three ledges for a 1800mm high gate: top, middle and bottom. The top and bottom ledges should be positioned so hinges can fix into solid timber. The middle ledge helps stiffen the gate and gives extra fixing strength.
Pre-drill near timber ends to reduce splitting. Fix through the ledges into the face boards using suitable exterior fixings.
Step 6: Check the gate is square
Before fitting the brace, measure diagonally from corner to corner. Then measure the opposite diagonal. If both diagonal measurements match, the gate is square. If not, adjust the gate before adding the brace.
This is one of the most important steps. A brace locks in the shape. If the gate is out of square before bracing, the brace can preserve the mistake.
Step 7: Mark hinge side and latch side
Before cutting the brace, write “hinge side” and “latch side” lightly on the back of the gate. This avoids the common mistake of fitting a beautiful brace in the wrong direction.
Remember: when looking at the back of the gate, the brace should run from upper latch side down towards lower hinge side.
Step 8: Cut and fit the brace
Offer the brace timber across the ledges. Mark the angles where it meets the ledges, then cut carefully. The brace should fit snugly. A loose brace does not support the gate properly.
Fix the brace into the ledges using exterior-grade fixings. If using two braces between three ledges, keep the same anti-sag principle in mind: each brace should help transfer load back towards the hinge side.
If you flip the gate over, change hinge side, or hang it the other way round, the brace direction changes. Always decide the finished hinge side before fitting the brace.
Step 9: Trim the sides if needed
Once the gate is braced, trim the outside edges if needed. This is especially useful with featheredge boards because the overlap may leave one side looking less tidy.
Do not trim so much that you remove the clearance you planned earlier. Check the finished width before cutting.
Step 10: Fit hinges to solid timber
Position hinges so the screws or bolts bite into ledges, not only into thin face boards. Tee hinges and strap hinges normally work best when they cross the ledges and spread the load.
Pre-drill fixing holes and use fixings suitable for exterior use and treated timber. Do not rely on short, weak screws for a gate that will be opened and slammed repeatedly.
Step 11: Hang the gate
Pack the gate into the opening using wedges or temporary packers. Set the side gaps and bottom clearance before fixing the hinges to the post or frame.
- Set the gate at the correct height.
- Pack the hinge side and latch side evenly.
- Check the gate is not rubbing the ground through its swing.
- Mark hinge positions.
- Pre-drill and fix the hinges.
- Test the swing before fitting the latch.
Step 12: Fit latch, stops and final protection
Fit the latch at a comfortable height, with solid backing where the latch screws fix. Add a simple gate stop or door stop if needed so the gate closes consistently and does not over-swing.
Protect cut ends, especially along the bottom edge, ledge ends and brace cuts. Keep the bottom of the gate clear of soil, wet leaves and standing water.
Before you order checklist
- Have you measured the opening at top, middle and bottom?
- Have you checked which side will be the hinge side?
- Have you allowed side clearance for hinges and latch?
- Have you allowed enough bottom clearance for the whole swing?
- Are the posts or frame strong enough to carry the gate?
- Have you chosen the face board to suit the application?
- Have you calculated board coverage using overlap or effective coverage?
- Have you allowed three ledges for a taller 1800mm gate?
- Have you planned the brace direction before cutting?
- Have you included hinges, latch, exterior fixings and treatment for cut ends?
Useful Wern-Wood categories for this build
| Part of the gate | What to browse |
|---|---|
| Structural ledges and braces | Structural treated timber |
| General treated timber | Treated sawn timber |
| Featheredge-style gate boards | Treated featheredge boards |
| Shed door or outbuilding cladding | Timber cladding |
| Bottom kick board or protective detail | Gravel boards |
| Screws and fixings | Timber fixings |
| Nails | Nails |
| Hinges, latches and bolts | Ironmongery |
| Ready-made alternative | Garden gates |
Common mistakes that make gates drop
- Bracing the wrong way: the gate looks braced, but the brace is not helping resist sag.
- Not marking hinge side first: the gate gets built for the wrong hanging direction.
- Fixing hinges into weak boards: hinges need solid ledge or structural timber behind them.
- Using too little bottom clearance: the gate scrapes as timber moves, the ground rises, or debris builds up.
- Ignoring post condition: a loose post makes even a well-built gate fail.
- Forgetting board coverage: featheredge and cladding boards need overlap or effective coverage calculated properly.
- Skipping cut-end protection: cut ends are often where moisture starts causing problems first.
FAQs
Is this guide for garden gates or shed doors?
Both. A lightweight side gate, garden gate and shed door can all use similar ledge-and-brace construction. This guide is not for driveway gates, field gates, double-wide gates or heavy gates.
What is the best board for a garden gate?
It depends on the application. Featheredge suits featheredge-style garden gates and fence-matching gates. Tongue and groove, shiplap and loglap are often better suited to shed doors and outbuilding-style doors.
Which way should the brace go on a ledge-and-brace gate?
When looking at the back of the gate, mark the hinge side and latch side first. The brace should run from the upper latch side down towards the lower hinge side, so it helps resist the latch side dropping.
Do I need two braces?
For a 900mm x 1800mm gate, two braces between three ledges can make the build neater and more stable. One full diagonal brace can work, but the brace must still be fitted the correct way.
Can I use gravel board on a gate?
A treated timber gravel board can be useful as a lower protective kick board or detail where suitable, especially where the bottom of the gate may get knocked or exposed to wet grass and splashback. Do not make the gate unnecessarily heavy.
Should I replace the posts at the same time?
If the hinge post is rotten, loose, leaning or undersized, fix that before blaming the gate. This guide focuses on the gate leaf only; a full gate post guide should cover post sizing, depth, setting and postmix properly.
Can I just buy a ready-made gate?
Yes. If you want a quicker option or a consistent finished gate, browse Wern-Wood’s ready-made garden gates. Building your own is useful when you need a custom size, matching cladding or a shed-door style finish.
Final thought: build the gate around the hinge side
A lightweight timber gate is simple, but it has one job: stay square while hanging from one side. That means everything should be planned around the hinge side, latch side, brace direction and fixing strength.
Measure the opening properly, choose the board to suit the application, use treated timber, fit the brace the right way, and make sure the hinges bite into solid timber. That is what makes the difference between a gate that swings cleanly and one that drags by winter.
Building a side gate, garden gate or shed door?
Browse treated structural timber, treated cladding, featheredge boards, gravel boards, fixings and ironmongery online. If building your own is not the right route, you can also browse ready-made garden gates.
Shop Structural Treated Timber → Order online or collect from our Briton Ferry yard. Yes, we deliver.General guidance only. This guide covers lightweight timber gate and shed-door construction, not engineered gates, driveway gates, field gates, double gates or heavy-duty access gates. Always check product specifications, fixing suitability, post condition, site exposure and safe working practices before building.