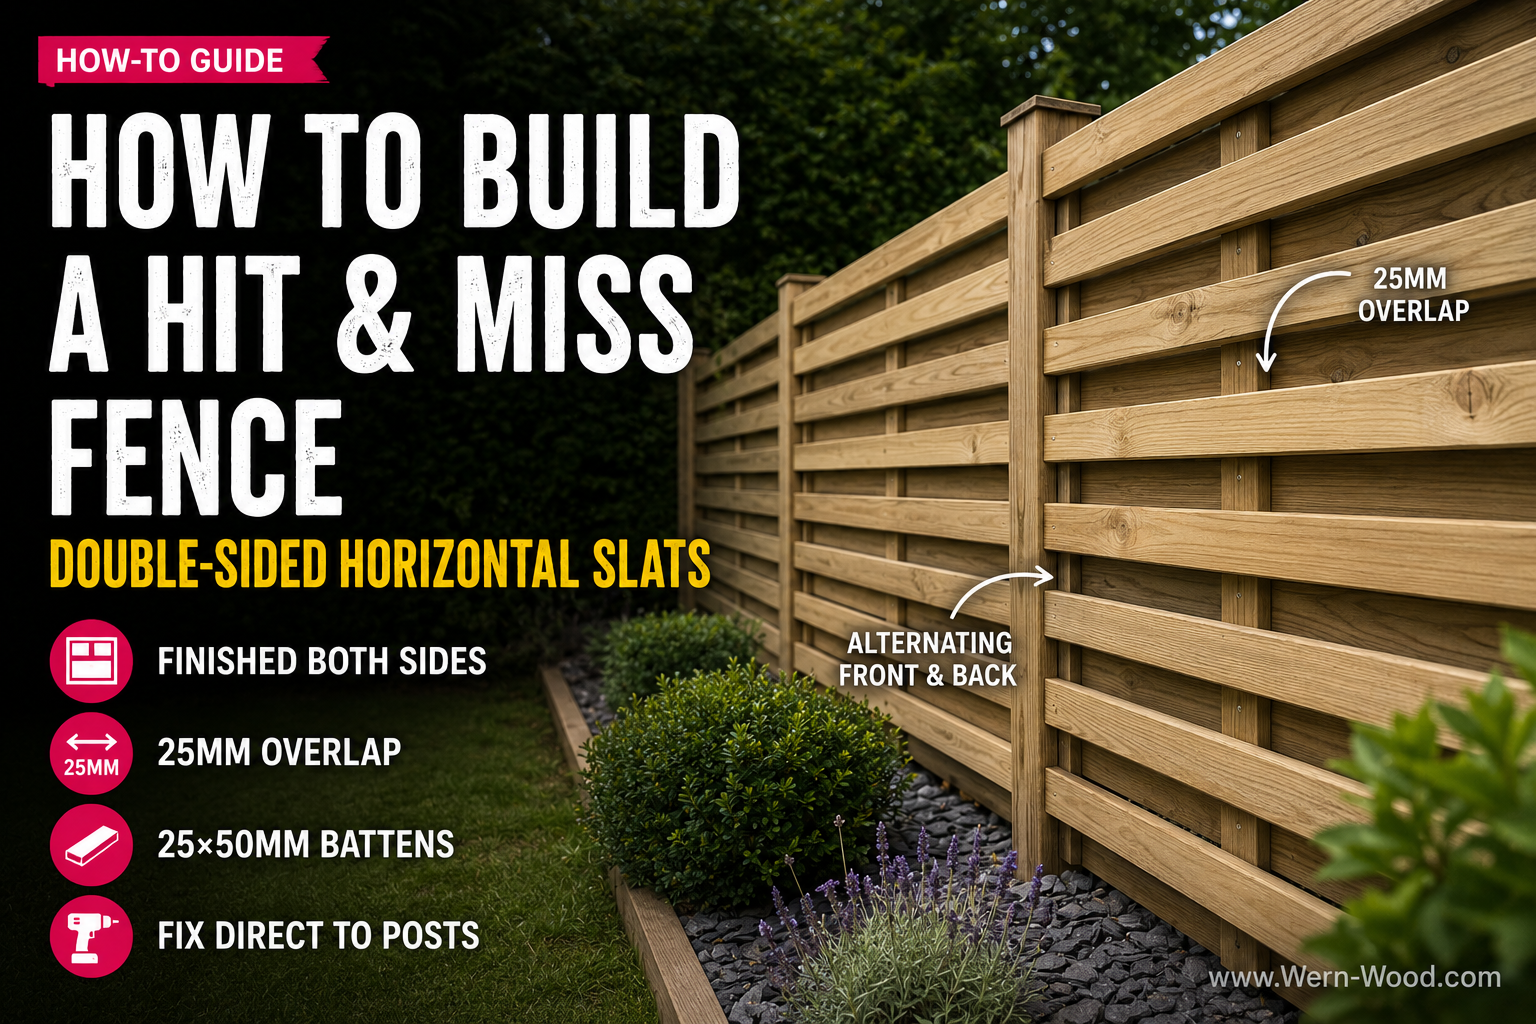
How to Build a Hit and Miss Fence — The Double-Sided Horizontal Slatted Fence
A hit and miss fence uses horizontal timber battens running across between posts, stacked from the ground up with an even gap between each one. The battens alternate — the first fixed to the front face of the posts, the next fixed to the back face, overlapping slightly. From the front it looks like a clean modern slatted screen. Walk around the back and it looks exactly the same. That double-sided finish is what makes it different from a Venetian screen. Use 25×50mm (2×1) rounded edge landscaping batten. Use our Landscaping Batten Calculator to get the exact quantity before you order.
You have probably seen the horizontal slatted garden screen becoming popular in gardens across South Wales — clean lines of timber running across a frame, gaps letting light through, a modern finish that looks nothing like a traditional panel fence.
A hit and miss fence is that same style, built with one important difference: both sides look identical. Where a Venetian screen has all battens fixed to the same face of the frame — finished on the front, exposed frame on the back — a hit and miss fence alternates each batten between the front and back face of the posts. The front looks great. Walk around to the back and it looks exactly the same.
That makes it the right choice for shared boundaries, side returns, or any fence where both sides are visible and both sides need to look good.
Hit and miss vs Venetian screen: what is the difference?
Both styles use the same horizontal battens. Both look like a modern slatted screen from the front. The difference is what happens on the other side.
| Feature | Hit and miss | Venetian screen |
|---|---|---|
| Batten orientation | Horizontal — running across between posts | Horizontal — running across between posts |
| How battens are fixed | Alternating — one on front face, next on back face | All fixed to the same face of the frame |
| Appearance from both sides | Identical — both sides look finished | Single sided — front looks great, back shows frame |
| Wind resistance | Good — air passes through the gaps | Good — air passes through the gaps |
| Best for | Shared boundaries where both sides are visible | Garden dividers, screens, one side only visible |
What you will need
- Treated timber posts
- Landscaping battens (25×50mm)
- Postcrete or post mix
- Gravel boards (optional)
- Exterior timber screws
- Spacer block
- Spirit level
- String line
- Tape measure and pencil
- Drill
| Material | Specification | Notes |
|---|---|---|
| Posts | 100×100mm treated softwood | One post at each end of the bay — total post length = fence height + 600mm min. |
| Battens | 25×50mm (2×1) rounded edge landscaping batten | Horizontal — running from post to post. Use the calculator for exact quantity. |
| Post mix | Postcrete rapid set 20kg | 1–2 bags per post depending on ground conditions |
| Gravel boards | Timber or concrete | Optional but recommended — keeps bottom battens off the ground |
| Screws | Stainless or galvanised exterior grade | Two screws per batten end — do not use internal screws outside |
How to build it — step by step
Unlike a vertical close board fence which needs rails fixed between posts, a horizontal hit and miss fence fixes the battens directly to the posts. The horizontal battens span from post to post — no separate rails required.
Plan your bays and mark the post positions
A hit and miss fence is built in bays — sections running between two posts. Keep each bay to a maximum of 1.8m wide. Beyond this, long horizontal battens can flex and sag in the middle without additional support.
For a 3.6m run you need three posts — one at each end and one in the middle. Mark your post positions with pegs and a string line before anything goes in the ground. Correct spacing now saves a lot of correction later.
Set the posts
Dig post holes to the correct depth. The standard rule is one third of the total post length in the ground. For a 1.8m fence, use a 2.4m post with 600mm buried.
Add a small amount of gravel to the base of each hole for drainage. Set the post, check plumb on two faces with a spirit level, and pour Postcrete around the base. Brace while it sets. Leave overnight before continuing.
Get the posts plumb and in line — because the horizontal battens span directly from post to post, any misalignment in the posts will show clearly in the finished fence.
Fix the first batten
Once posts are fully set and solid, start fixing battens from the bottom of the fence upward. If you are using a gravel board, fix it first so the lowest batten sits above ground level.
Fix your first horizontal batten to the front face of the posts, running from post to post. Use two screws at each end — one near the top edge of the batten and one near the bottom edge. Pre-drill near the ends to avoid splitting.
Check the batten is level before committing the second screw at each end. A batten that is out of level at the bottom will throw every batten above it off.
Work up the fence alternating front and back
This is where the hit and miss pattern is built. Cut a spacer block to your chosen gap width — typically 20–30mm. Place the spacer on top of the first batten, then fix the second batten to the back face of the posts, overlapping the first batten by approximately 25mm.
Continue from there, alternating every batten between front and back face all the way up the posts:
- Batten 1 — front face
- Batten 2 — back face, overlapping batten 1 by 25mm
- Batten 3 — front face, overlapping batten 2 by 25mm
- Batten 4 — back face, overlapping batten 3 by 25mm
- Continue to the top
Use the spacer block between each batten to maintain a consistent gap throughout. Check level with a spirit level every three or four battens — if a batten is out of level, correct it before moving up.
Finish and cap
Trim any battens to length where needed for a clean finish at the posts. Apply end grain preservative to any freshly cut ends. Fit post caps to the top of each post to prevent water ingress and extend the life of the post.
Step back and view from both sides — the front and back should look identical. If the gap and overlap are consistent throughout, the finished fence will look clean and considered from either direction.
Leave natural, stain or paint. Pressure treated landscaping batten takes exterior finishes well. Dark grey and charcoal are particularly popular for a contemporary look.
Cut one spacer block to your exact gap width and use it for every single batten on every single bay. It takes one minute to make and guarantees perfectly even gaps from bottom to top. Do not try to measure each gap individually — small errors accumulate and the unevenness becomes obvious by the time you reach the top.
Getting the overlap right
The overlap between front and back battens is the key measurement. Too little and you can see straight through the fence — privacy is lost. Too much and the gap between adjacent battens closes up, reducing the airflow and the slatted look.
| Overlap | Effect | Best for |
|---|---|---|
| 15–20mm | More visible gap, airier feel, less privacy | Garden dividers, low boundary screens |
| 25mm | Balanced — good privacy, good airflow, clean look | Most boundary fences — the standard starting point |
| 30–35mm | More privacy, tighter appearance, less wind benefit | Where privacy is the priority |
How many battens do you need?
The quantity depends on the height of your fence, the width of your battens, your chosen gap, and the overlap between front and back battens. It is more involved to calculate than a simple screen because of the alternating pattern.
Use the calculator — input your fence height, width, batten size, gap and overlap and it returns the exact quantity to order.
Add 5–10% to your calculated quantity. Splits, bad cuts, and the odd mistake are normal on any fencing project. Running short and waiting on a second delivery is far more frustrating than having a few lengths left over.
How deep should fence posts be?
| Fence height | Minimum post in ground | Total post length |
|---|---|---|
| Up to 1.2m | 450mm | 1.8m post |
| 1.5m | 500mm | 2.1m post |
| 1.8m | 600mm | 2.4m post |
| 2.0m+ | 700mm+ | 3.0m post |
Frequently asked questions
What does a hit and miss fence look like?
A hit and miss fence looks like a modern horizontal slatted screen — clean timber battens running in parallel lines from post to post, with an even gap between each one. The battens alternate slightly in depth, giving a subtle layered effect when you look along the fence. It looks identical from both sides.
What is the difference between a hit and miss fence and a Venetian screen?
Both use horizontal battens and look the same from the front. A Venetian screen has all battens fixed to the same face of the frame — one side looks finished, the other shows the frame. A hit and miss fence alternates each batten between the front and back face of the posts, so both sides look identical. Hit and miss is the right choice wherever both sides of the fence are visible.
Do I need rails for a horizontal hit and miss fence?
No. Unlike a vertical close board fence which needs horizontal arris rails fixed between posts, a horizontal hit and miss fence fixes the battens directly to the posts. The battens themselves span from post to post — no separate rails are required.
What batten size is best?
25×50mm (2×1) rounded edge landscaping batten is the most widely used size. The rounded edges give a clean, finished look from both sides. Wider battens like 22×75mm (3×1) give a chunkier profile with fewer battens needed to cover the same height.
How much overlap should the battens have?
25mm is the standard starting point — enough to block direct sightlines while keeping a clean gap between adjacent battens. Go to 30–35mm if privacy is the priority. Anything less than 15mm and the privacy benefit is largely lost.
Does hit and miss fencing need planning permission?
In most cases, garden fencing under 2m high does not require planning permission in England and Wales. Always check with your local planning authority if unsure, particularly for properties adjacent to a highway or in a conservation area.
Ready to build your hit and miss fence?
Use the calculator to get your exact batten quantity, then order online with delivery across South Wales.
Calculate Your Quantities →Shop Landscaping BattenDelivery across South Wales. Real stock. Real people.