Build a Hedgehog House That Is Actually Worth Hiding in the Garden
A good hedgehog house should be quiet, dry, hidden and difficult for predators to reach. Use suitable untreated plywood, include an entrance tunnel or baffle, make the roof removable for cleaning or checking, and place it in a shaded, sheltered part of the garden. If a hedgehog is inside, replace the roof and leave it alone.
A hedgehog house is not just a box with a hole in the front. If it is too exposed, too wet, too easy for predators to reach, or too often disturbed, hedgehogs are unlikely to treat it as a safe shelter.
This guide builds a simple plywood hedgehog house with a main nesting chamber, entrance tunnel and removable roof. It is a general beginner wildlife shelter project, not a feeding station and not a specialist rescue enclosure.
- Untreated plywood
- Entrance tunnel included
- Removable roof
- Solid-floor or open-base option
- Quiet garden placement
- Low-disturbance design
Use untreated plywood or suitable untreated timber only. Do not treat, paint, stain or preserve the inside of the hedgehog house. If your available sheet or timber is treated, coated, film-faced or unsuitable for wildlife shelter use, choose a different material before building.
What makes a good hedgehog house?
A useful hedgehog house should give shelter from weather, reduce disturbance and make it harder for larger animals to reach inside. The tunnel or internal baffle is not just decorative. It helps stop predators from being able to reach straight into the nesting chamber.
The house should be placed somewhere quiet, shady and sheltered. The Wildlife Trusts recommend a shady, quiet spot and specifically warn not to skip the tunnel because it helps prevent predators from reaching inside. The Natural History Museum also recommends a flat, quiet and shady spot, ideally near a garden boundary such as the foot of a wall or fence.
Use plywood as the main material route
For this project, suitable plywood is the main material route. A plywood box is easier to plan from panels than trying to build the whole shelter from narrow boards.
Choose an untreated plywood suitable for the project. Avoid treated, coated or film-faced boards for this wildlife shelter. If using an alternative such as untreated PSE timber, check that it is suitable, thick enough and practical to build into a weather-resistant box.
| Material | Suitable? | Notes |
|---|---|---|
| Untreated plywood | Yes | The preferred route for this panel-built hedgehog house. |
| Untreated PSE timber | Possible | Can work if suitable, but plywood is easier for this box-style design. |
| Treated timber | No | Avoid treated material for the hedgehog house. |
| Film-faced, coated or unknown sheet material | No | Use a known, suitable untreated material instead. |
Solid floor or open base?
There are two sensible approaches. This guide gives a solid-floor cut list because it is easier for a beginner to build and move as one box. However, an open-base design can also be suitable where the house sits on dry, well-drained ground and is packed naturally with leaves.
| Base style | Best for | Watch out for |
|---|---|---|
| Solid floor | A beginner-friendly box that can be assembled as one unit and kept dry if placed properly. | Do not let water collect inside. Add small drainage holes and keep the house off wet, boggy ground. |
| Open base | A more natural floor where the house sits on dry soil, leaf litter or a prepared sheltered area. | The site must drain well. Avoid placing it where water pools or where the chamber becomes damp. |
If you are unsure, build the solid-floor version below, add a few small drainage holes, and place it somewhere sheltered and dry. If your garden has a naturally dry, hidden spot under shrubs or near a boundary, an open-base version can also work well.
Cut list for a plywood hedgehog house
This cut list creates a simple rectangular hedgehog house with a main chamber, entrance opening and internal tunnel/baffle. Use it as a practical beginner build. If your plywood thickness changes, dry-fit the pieces before final fixing.
| Part | Quantity | Cut size | Notes |
|---|---|---|---|
| Back panel | 1 | 400mm x 300mm | Forms the rear of the nesting chamber. |
| Side panels | 2 | 400mm x 300mm | Long sides of the main chamber. |
| Front panel | 1 | 400mm x 300mm | Cut an entrance opening near one side, around 120mm square. |
| Floor panel | 1 | 400mm x 300mm | Use for the solid-floor version. Omit for an open-base version. |
| Roof panel | 1 | 460mm x 360mm | Oversized to create weather overhang. Make removable. |
| Internal baffle / tunnel divider | 1 | 250mm x 220mm | Creates a protected turn into the nesting chamber. |
| Optional tunnel side pieces | 2 | 300mm x 150mm | Use if building a short external entrance tunnel rather than an internal baffle only. |
| Optional tunnel roof | 1 | 300mm x 180mm | Creates a covered entrance tunnel. |
Around 120mm square is a practical entrance size for hedgehogs while discouraging larger animals. Keep the entrance tunnel or baffle in the design; it helps protect the nesting chamber.
Materials and tools
Materials
- Suitable untreated plywood
- Exterior-suitable screws from timber fixings
- Optional suitable nails from nails
- Optional untreated PSE timber for battens, stops or small fixing blocks if needed
- Dry leaves or straw for bedding material
- Optional waterproof cover layer outside the box, fitted so the roof remains accessible
Tools
- Tape measure
- Pencil
- Square
- Saw or circular saw
- Drill/driver
- Drill bit for pilot holes
- Jigsaw or handsaw for entrance opening
- Sandpaper for sharp edges
- Eye protection and suitable dust protection
Cutting and sanding plywood or timber can create harmful dust. Work outside or in a well-ventilated area where practical, clamp the work securely, avoid breathing dust, and use suitable eye protection and respiratory protection.
Step-by-step build method
Step 1: Mark and cut the panels
Mark every panel before cutting: back, front, two sides, floor, roof and baffle. Label each piece in pencil so you do not mix them up during assembly.
Cut slowly and keep the edges as neat as possible. Lightly sand sharp edges, especially around the entrance opening.
Step 2: Cut the entrance opening
Cut an entrance opening in the front panel, close to one side rather than centred. Around 120mm square is a practical size. Keeping it to one side helps the tunnel or baffle create a protected route into the main chamber.
Remove sharp splinters around the entrance. The opening should be smooth enough that it does not catch or scrape.
Step 3: Assemble the main chamber
Fix the side panels to the back panel, then fit the front panel. Pre-drill pilot holes to reduce splitting and keep the panels aligned as you work.
If building the solid-floor version, fit the floor panel now. Drill a few small drainage holes so moisture cannot sit inside the box.
Step 4: Fit the tunnel or baffle
Fit the internal baffle so a hedgehog has to turn before entering the nesting chamber. This protects the chamber from direct wind, rain and predators reaching straight through the entrance.
If you are building the optional external tunnel, assemble the tunnel pieces and fix them to the entrance. Do not skip this protection stage. It is one of the most important parts of the design.
A plain box with a hole is easier for predators, pets and weather to reach. The tunnel or baffle makes the shelter more protected and more useful as a hiding place.
Step 5: Fit the roof as a removable lid
The roof should overhang the sides and front to help shed rain. It should also be removable so the house can be checked or cleaned when it is definitely empty.
Use simple stops, battens or a safe fixing method to keep the roof in place without permanently sealing it shut. The roof should not blow off in wind, but you should still be able to remove it when needed.
Step 6: Keep the inside untreated
Do not paint, stain, oil or preserve the inside. Leave the internal chamber bare and clean. Add dry leaves or straw as bedding material, and leave extra dry leaves nearby so hedgehogs can arrange the nest themselves.
If adding any weather protection outside the box, keep it external and make sure the removable roof can still be accessed.
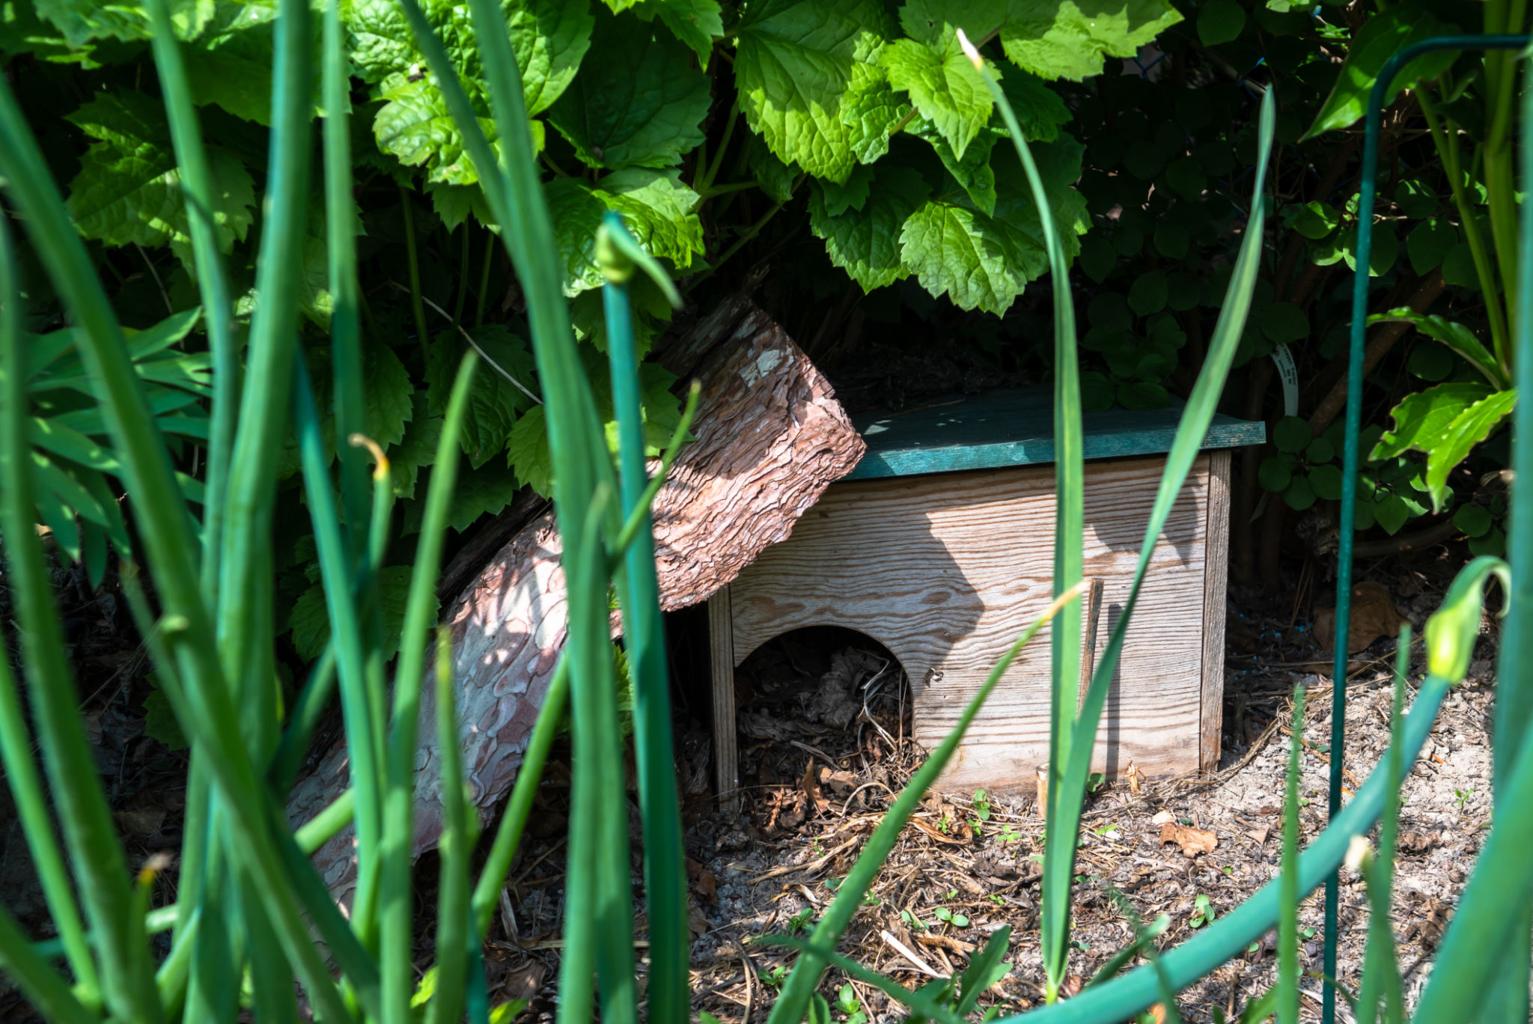
Where to place the hedgehog house
Choose a quiet, shaded and sheltered part of the garden. A spot near a boundary, under shrubs, by a hedge or close to a fence line often makes more sense than an open lawn.
- Place it somewhere quiet and low-disturbance.
- Face the entrance away from the worst wind and rain.
- Hide it under shrubs, hedge cover, logs or leaves.
- Keep the entrance clear enough for hedgehogs to get in and out.
- Avoid putting it where water pools.
- Do not turn the shelter into a feeding station.
This guide is about building a shelter, not feeding hedgehogs. If you feed hedgehogs, keep food and water away from the house so the shelter stays quiet and does not attract unnecessary attention to the sleeping area.
When and how to check or clean it
Hedgehog houses should be disturbed as little as possible. Only check or clean the house when you are confident it is not being used. If you lift the roof and find a hedgehog inside, replace the roof carefully and leave it alone.
Wildlife guidance varies slightly on the best cleaning window. The safest beginner advice is to avoid hibernation and nesting periods, check only when the house is empty, and keep disturbance to an absolute minimum.
Do not move, clean or dismantle the house if a hedgehog is inside. Replace the roof, back away, and let the animal continue using the shelter undisturbed.
Before you order checklist
- Have you chosen suitable untreated plywood?
- Have you avoided treated, coated or film-faced sheet material?
- Have you planned an entrance tunnel or internal baffle?
- Have you decided between a solid-floor and open-base design?
- If using a solid floor, have you allowed small drainage holes?
- Will the roof be removable for checking or cleaning?
- Have you planned a quiet, shady and sheltered position?
- Will the entrance face away from the worst weather?
- Can the house be hidden with leaves, logs or planting?
- Have you planned to leave the inside untreated?
Useful Wern-Wood categories for this build
| Part of the project | What to browse |
|---|---|
| Main box material | Plywood sheets |
| Optional untreated timber details | Planed PSE timber |
| Screws | Timber fixings |
| Nails | Nails |
Common mistakes that make hedgehog houses less useful
- Skipping the tunnel or baffle: the chamber becomes easier for predators or pets to reach.
- Using treated or coated material: use suitable untreated plywood or untreated timber only.
- Fixing the roof permanently: the house needs access for checking or cleaning when empty.
- Placing it in the open: hedgehogs prefer hidden, quiet and sheltered spaces.
- Putting it where water pools: a damp house is unlikely to be useful.
- Disturbing it when occupied: if a hedgehog is inside, replace the roof and leave it alone.
- Turning it into a feeding station: keep food away from the sleeping shelter.
FAQs
What should I build a hedgehog house from?
Use suitable untreated plywood as the main route for this guide. Untreated PSE timber may work for some details, but plywood is easier for a panel-built box.
Can I use treated timber?
No. For this wildlife shelter, use suitable untreated material. Do not use treated, coated or film-faced material, and do not treat the inside.
Does a hedgehog house need a tunnel?
Yes, include an entrance tunnel or internal baffle. It helps protect the nesting chamber from predators, pets and direct weather.
Should the hedgehog house have a floor?
A solid floor is beginner-friendly and easy to build, provided it is kept dry and has drainage holes. An open-base design can also be suitable on dry, well-drained ground.
Should the roof be removable?
Yes. The roof should be secure but removable so the house can be checked or cleaned when empty. If occupied, replace the roof and leave the hedgehog alone.
Where should I put a hedgehog house?
Choose a quiet, shady, sheltered spot, ideally near a boundary, hedge, shrubs or fence line. Face the entrance away from the worst weather and avoid wet ground.
Should I put food inside the hedgehog house?
No. Keep this as a quiet sleeping or nesting shelter. If you feed hedgehogs, place food and water away from the house.
When should I clean it?
Only clean it when you are certain it is empty. Avoid hibernation and nesting periods. If you find a hedgehog inside, replace the roof and leave it undisturbed.
Final thought: make it hidden, dry and undisturbed
A hedgehog house does not need to look perfect. It needs to feel safe. That means untreated material, a protected entrance, a dry chamber, a removable roof, and a quiet position where the animal is unlikely to be disturbed.
Build the shelter carefully, hide it well, and then resist the temptation to keep checking it. The less it is disturbed, the more useful it is likely to be.
Building a hedgehog house?
Browse plywood sheets, untreated PSE timber where suitable, screws and nails online. Keep the design simple, use suitable untreated material, and build the shelter around wildlife-safe guidance first.
Shop Plywood Sheets → Order online or collect from our Briton Ferry yard. Yes, we deliver.General guidance only. This article covers a simple beginner hedgehog house for a domestic garden. For injured, underweight or visibly unwell hedgehogs, contact a qualified wildlife rescue or veterinary professional. For species and conservation-specific advice, follow current guidance from recognised wildlife organisations.