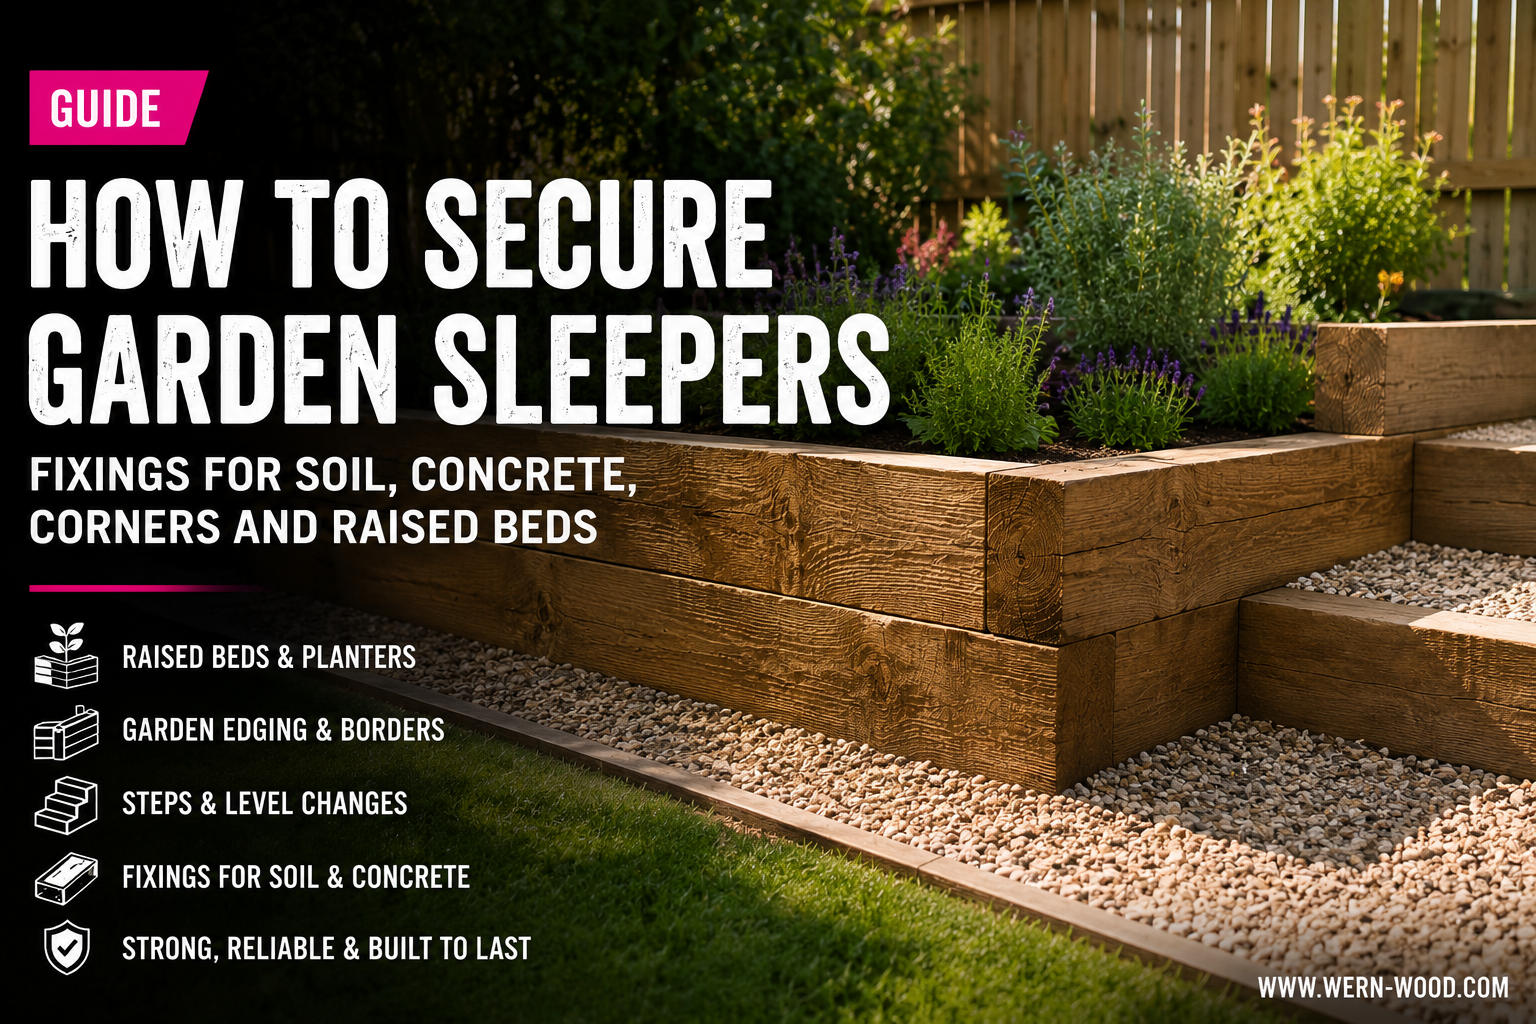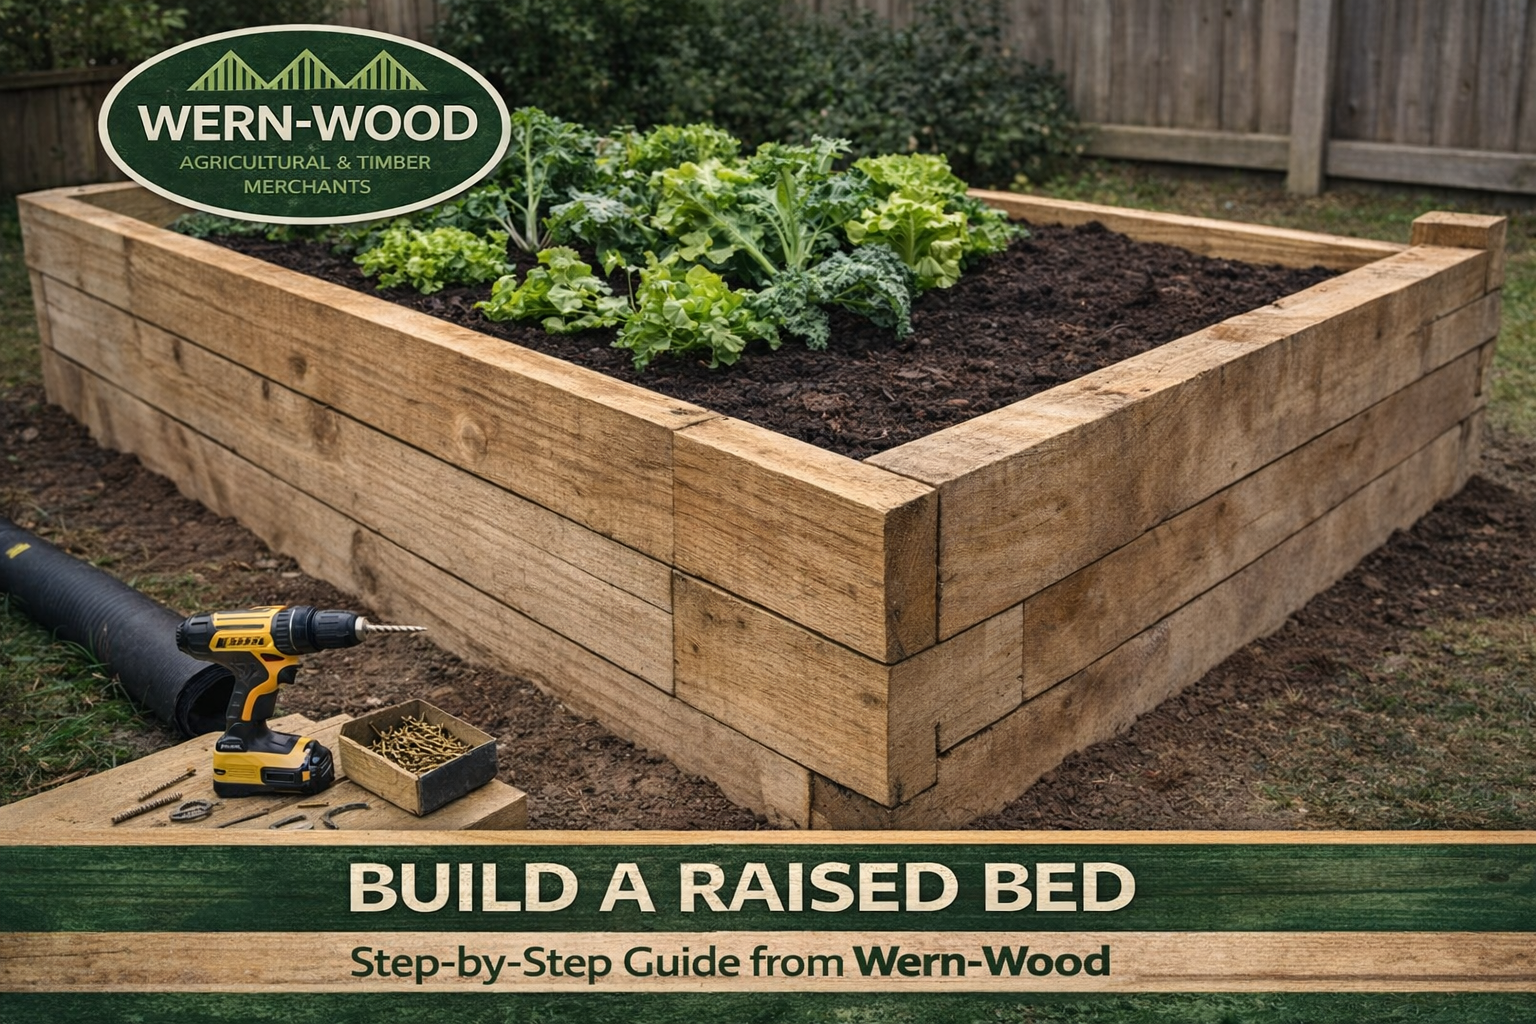
Build a Raised Bed That Doesn’t Bow Out After One Wet Winter
A raised bed that stays straight needs strong timber, short sensible runs, proper sleeper fixings, drainage and support against soil pressure. For most beginner builds, garden sleepers are the best route. Build around 2.4m lengths where possible to reduce cutting, cut the width to suit your space, and use sleeper brackets, plates or spikes to keep the corners and joints controlled.
Raised beds look simple, but they have one awkward job: holding back a heavy mass of damp soil. If the sides are too light, too long, badly fixed or poorly supported, the bed can start to bow, twist or open at the corners after wet weather.
This guide shows how to plan a practical sleeper raised bed for vegetables, herbs or flowers. The focus is not on the cheapest possible planter. It is on a sensible garden build that stays square, drains properly and uses the right fixings from the start.
- Garden sleepers as main route
- 2.4m length planning
- Two sleepers high preferred
- Sleeper brackets and hardware
- Food-growing caution included
- Basic cut planning method
This guide is for domestic raised beds used for gardening. It is not a specification for retaining walls, terracing, high soil banks, slopes, vehicle edges, steps or structural landscaping. If the bed is holding back a bank, supporting a change in ground level or carrying unusual loads, use a suitable specification and competent advice.
Why raised beds bow out
Bowing is usually caused by pressure. Wet soil is heavy, and the pressure pushes outward against the sides of the bed. The longer the unsupported side, the more obvious the movement can become.
The usual causes are:
- Long sides with no middle support
- Corners fixed with light or unsuitable screws
- Timber too light for the amount of soil
- No sleeper brackets, plates or spikes
- Poor drainage keeping the bed constantly wet
- Too much height without enough restraint
Use garden sleepers as the main route
For most beginner raised beds, garden sleepers are the most straightforward route. They are substantial, easier to set out than lots of thin boards, and Wern-Wood’s sleeper collection includes the hardware needed for sleeper projects, including brackets, plates, spikes and anchors. The collection also includes different sleeper lengths, including 2.4m, which is useful for raised beds.
The alternative some customers use successfully is larger treated fence posts such as 4x4, 5x4 or 6x6, where the specific product is suitable for ground contact. These can be easier to cut and handle than full sleepers for some layouts, but the same rules still apply: support the corners, control the joints, and avoid long unsupported runs.
| Material route | Best for | Watch out for |
|---|---|---|
| Garden sleepers | Most sturdy raised beds, especially two sleepers high. | Heavy to handle. Plan delivery, lifting and fixing before starting. |
| Large treated fence posts | Smaller beds or layouts where posts are easier to cut and handle. | Check the treatment/use suitability and still use proper restraint. |
| Gravel boards | Very light-duty edging or shallow planters with proper framing. | Not ideal for heavy raised beds without a frame and support system. |
Food-growing material caution
Many raised beds are used for vegetables and herbs, so material choice matters. Modern pressure-treated timber is commonly used for raised beds, and the RHS describes pressure-treated timber as a popular and durable raised bed material. The RHS also recommends free-draining ground and sensible bed sizing when planning raised beds.
For edible growing, avoid reclaimed sleepers or timber with an unknown treatment history. Do not use creosote-treated railway sleepers, painted waste timber or anything leaking oily residue. If you are unsure about a product’s treatment or suitability for vegetable beds, check the product information before building.
Use timber intended for landscaping or raised bed use, check the product specification where needed, and consider lining the inside face of the bed with a suitable barrier. The liner should separate soil from timber, but it should not turn the bed into a sealed container. Drainage still matters.
Choose the size before choosing the cut list
A raised bed should be easy to reach across. Very wide beds are awkward to plant, weed and harvest without standing in the soil. RHS advice suggests keeping widths under around 1.5m so you can reach the centre without stepping into the bed.
A practical beginner layout is:
- Length: 2.4m, using full sleeper length where possible
- Width: 0.9m to 1.2m, cut to suit your space and reach
- Height: two sleepers high for a useful growing depth
- Alternative: one sleeper high for a simpler, lower-pressure bed
If you want less cutting, let the sleeper length decide the long side. Use 2.4m sleepers for the long sides, then cut the short sides to the width you actually want.
Basic cut planning examples
These are planning examples, not the only possible sizes. The exact cut depends on your chosen sleeper size, finished width, fixing method and whether you are stacking one or two courses.
| Raised bed size | Timber plan | Hardware plan |
|---|---|---|
| 2.4m x 1.2m, two sleepers high | Use full 2.4m sleepers for long sides. Cut short sides to suit the finished width. Repeat for second course. | Use sleeper corner brackets or corner spikes, plus straight plates/spikes where needed. |
| 2.4m x 0.9m, two sleepers high | Same long-side logic, with shorter cut ends for easier reaching across the bed. | Use proper corner fixings and consider mid-side restraint on the long runs. |
| 2.4m x 1.2m, one sleeper high | Lower, simpler bed with less soil pressure than a two-high build. | Still fix corners properly so the frame does not drift out of square. |
If using 3m sleepers, the same logic applies, but long sides are more likely to need additional support. Longer runs look tidy on paper, but they put more strain on corners and fixings once the bed is full.
Sleeper fixings: where the strength really comes from
Weight alone is not enough. A sleeper raised bed can look solid when empty, then move once it is filled with wet soil. Use fixings that match the layout rather than relying on a few long screws at the corners.
Wern-Wood’s sleeper range includes internal sleeper corner brackets, straight support plates, base anchors, straight support spikes, corner support spikes and double sleeper support spikes. These are designed to help join, align and restrain sleeper projects properly.
| Fixing type | Where it helps | Why use it |
|---|---|---|
| Internal sleeper corner bracket | Inside corners of raised beds. | Helps hold the corner square and reduces joint opening. |
| Straight flat support plate | Straight joins or stacked sleeper alignment. | Helps control movement where pieces meet or need tying together. |
| Corner support spike | Corners where ground restraint is needed. | Helps anchor the corner into the ground. |
| Straight support spike | Long sides and straight runs. | Helps reduce outward movement along longer sleeper runs. |
| Base anchor | Where sleepers are fixed onto concrete or a hard base. | Useful when the bed or edging is being restrained to a hard surface. |
Prepare the ground properly
A raised bed does not need a complicated foundation, but it does need a sensible base. Remove turf and soft organic material where the sleepers will sit, level the footprint and check the first course is square before building upwards.
For damp ground, improve drainage before building. A shallow layer of compacted gravel under the sleeper line can help reduce constant wet contact, but the bed still needs to drain freely.
Step-by-step build method
Step 1: Mark the footprint
Mark the outside of the bed using pegs, string or spray marker. Check that the width is practical to reach across. If you are growing vegetables or herbs, think about sunlight as well as where the bed looks neat.
Step 2: Prepare and level the base
Remove turf and soft material from the sleeper line. Level the ground so the first course does not rock or twist. If the ground is very wet, improve drainage before building.
Step 3: Lay the first course
Set the first course of sleepers in place. Use full 2.4m lengths for the long sides where possible, then cut the short sides to suit your chosen width.
Check the frame is square by measuring diagonally from corner to corner. If both diagonal measurements match, the frame is square.
Step 4: Fix the corners
Use suitable sleeper corner brackets, corner spikes or fixings from the sleeper range. Do not rely on the soil to hold the bed square. It is much easier to fix the first course properly now than correct a bowed bed later.
Step 5: Add the second course
For the preferred two-sleeper-high build, add the second course once the first course is square and fixed. Keep the corners aligned and use suitable plates, brackets or fixings to tie the courses together.
If possible, avoid lining up every joint in the same weak position. Where the layout allows, staggering joints can help the bed feel more controlled.
Step 6: Add long-side restraint where needed
Long sides are where bowing usually appears first. For 2.4m runs, good corner fixing may be enough for many low beds, but a deeper or heavily filled bed may benefit from straight support spikes, internal ties or mid-side restraint.
If you use 3m lengths or build higher than two sleepers, plan extra restraint rather than hoping the timber weight will do the job.
Step 7: Line the inside if suitable
A liner can help reduce direct soil contact and stop soil washing through gaps. Use a suitable liner or membrane on the inside faces only, and keep the bottom able to drain.
Do not create a waterproof box. Raised beds need drainage as much as they need moisture retention.
Step 8: Fill without overloading the sides
Fill the bed in layers rather than dumping all the soil in one go. Use suitable growing media for what you plan to grow. The RHS notes that raised bed depth depends on planting: shallow crops need less depth, while shrubs, fruit bushes and larger plants need more.
As the bed fills, watch the sides. If you see movement early, stop and add restraint before the bed is full.
Before you order checklist
- Are you building a raised bed, not a retaining wall?
- Have you chosen garden sleepers as the main material?
- Are you using 2.4m lengths to reduce cutting where possible?
- Have you chosen the width based on reach and garden space?
- Are you building one sleeper high or two sleepers high?
- Have you included sleeper corner brackets, plates, spikes or anchors?
- Have you planned extra restraint for longer or deeper beds?
- Have you checked whether the timber is suitable for your intended use?
- If growing vegetables or herbs, have you considered a suitable liner?
- Have you planned drainage so the bed does not become waterlogged?
Useful Wern-Wood categories for this build
| Part of the raised bed | What to browse |
|---|---|
| Main raised bed timber and sleeper hardware | Garden sleepers |
| Alternative larger treated timber options | Fence posts |
| General treated outdoor timber | Treated sawn timber |
| Screws and exterior timber fixings | Timber fixings |
| Light-duty edging only | Gravel boards |
Common mistakes that make raised beds fail
- Using timber that is too light: wet soil puts pressure on the sides.
- Making the bed too wide: you end up standing in the soil to reach the middle.
- Skipping sleeper brackets: corners and joins start opening as the bed fills.
- Long runs with no restraint: sides start bowing after wet weather.
- Poor drainage: the bed stays wetter than necessary and the timber works harder.
- Turning it into a retaining wall: holding back a bank is a different job.
- Using unknown reclaimed timber: avoid old treated or creosote-treated material for food-growing beds.
FAQs
What is the best timber for a raised bed?
For most beginner raised beds, garden sleepers are the best route because they are substantial, practical for landscaping and available with suitable sleeper fixings and brackets.
Can I build a raised bed from fence posts?
Some customers use larger treated posts such as 4x4, 5x4 or 6x6 for raised beds, especially where they are easier to cut and handle. Check the specific product suitability and still use proper fixing and restraint.
Can I use gravel boards for a raised bed?
Gravel boards are better kept to light-duty edging or shallow planters with proper framing. They are not the preferred route for a heavy raised bed full of wet soil.
How long should a sleeper raised bed be?
Many raised beds work well around 2.4m long because that matches a common sleeper length and reduces cutting. Longer beds may need more restraint along the sides.
How wide should a raised bed be?
Keep the width practical to reach across. Around 0.9m to 1.2m is often comfortable for many gardeners, while RHS advice suggests keeping widths under about 1.5m so you can reach the centre without standing on the soil.
Should I line a raised bed?
A suitable liner can help reduce direct soil contact with the timber and stop soil washing through gaps. Do not seal the bottom like a tank; the bed still needs drainage.
Can I grow vegetables in a treated sleeper raised bed?
Modern pressure-treated timber is commonly used for raised beds, but always check the product specification for your intended use. For edible growing, avoid unknown reclaimed timber, old railway sleepers, creosote-treated timber or painted waste timber.
Do I need sleeper brackets?
For a neat, solid raised bed, sleeper brackets, plates, spikes or anchors are strongly recommended. They help hold corners and joints square as the bed fills and timber moves.
Final thought: soil pressure always wins if you underbuild it
A raised bed does not fail because the idea is complicated. It fails because wet soil is heavy, corners move, and long sides bow when they are not restrained.
Use sleepers where possible, keep the size sensible, fix the corners properly, add restraint where needed, and think about drainage before filling. That is how you build a raised bed that stays tidy after the first wet winter.
Building a raised bed with sleepers?
Browse garden sleepers, sleeper brackets, plates, spikes and anchors in one place, then plan the timber, fixings and drainage before filling the bed with soil.
Shop Garden Sleepers → Order online or collect from our Briton Ferry yard. Yes, we deliver.General guidance only. This article covers domestic raised beds for gardens. Timber suitability, treatment specification, soil type, drainage, height, length, food-growing use and site conditions can change what is suitable. For retaining walls, slopes, high beds, structural landscaping or unusual ground conditions, seek competent advice.