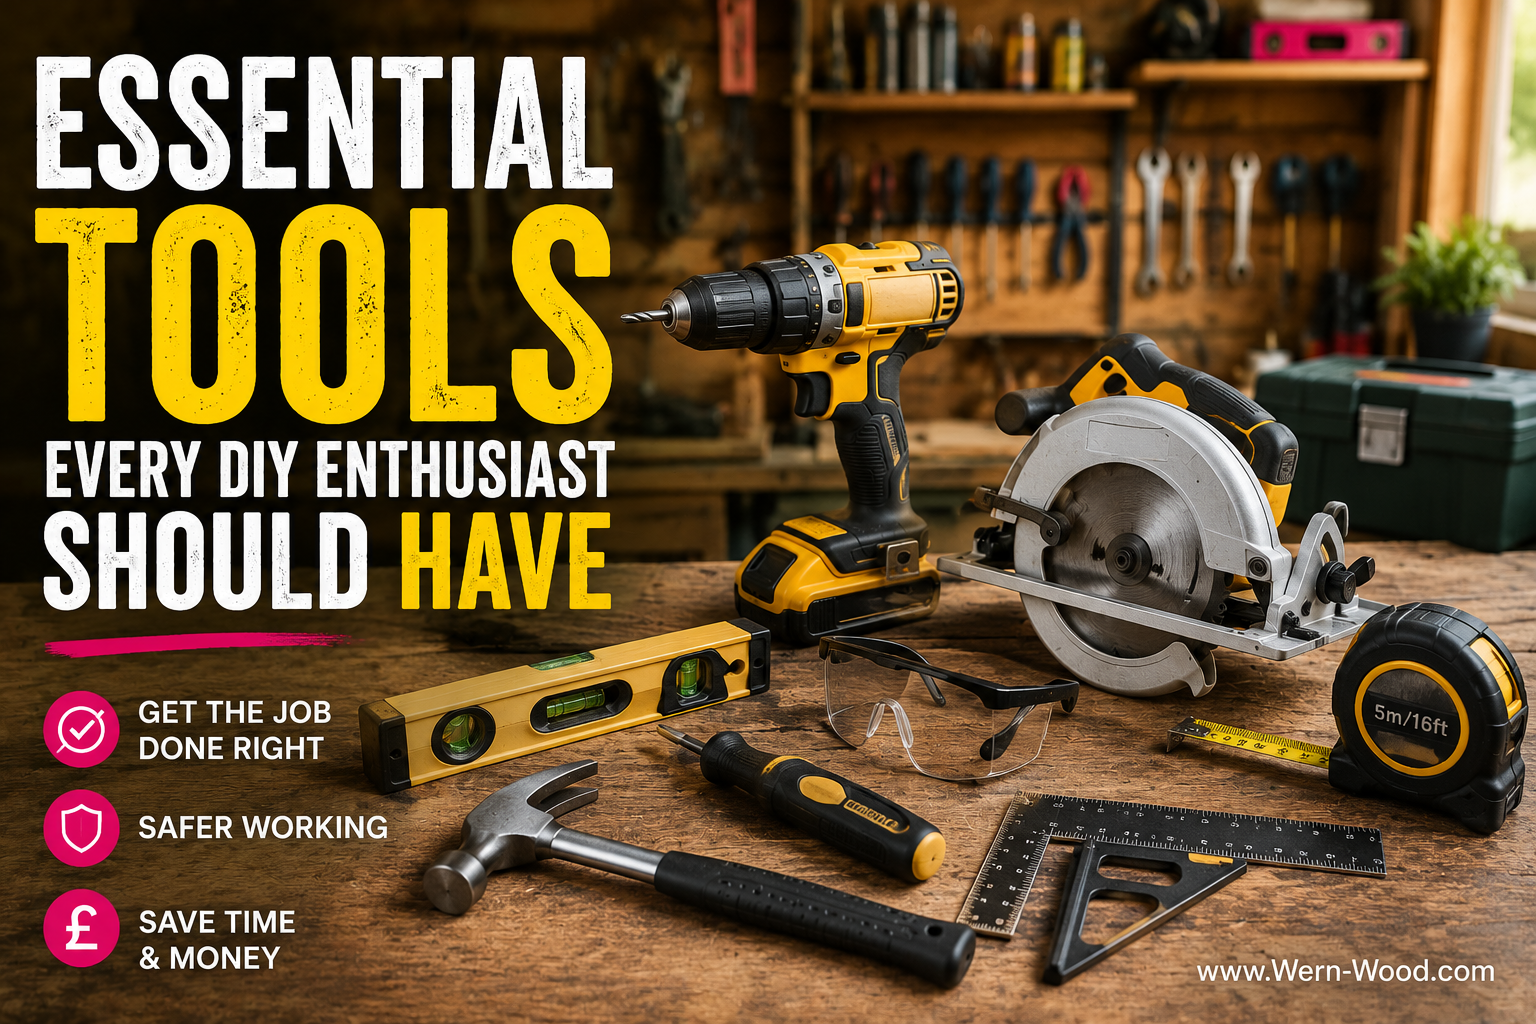
Your First Tool Kit: The Only 6 Things That Actually Matter
Six tools cover the overwhelming majority of home and garden timber work: a cordless drill/driver, a claw hammer, a screwdriver set, a tape measure, a spirit level, and a sharp utility knife. Get those right — with decent quality and proper bits — and you can handle fencing repairs, raised beds, decking, shelving, and most outdoor builds. PPE is not optional; add eye protection, hearing protection, gloves, and a dust mask before you buy anything else.
Most people start with the wrong question. They ask "what tools do I need?" when the question they should be asking is "what jobs am I actually going to do?" If you're fixing a dropped gate, building a raised bed, putting up a shelf, or repairing fence panels — which covers 90% of what a homeowner in Wales actually faces — you don't need a van full of gear. You need six tools, in decent quality, with the right consumables ready to go.
This is that list. Nothing aspirational. Nothing that'll sit unused in a cupboard for three years. Just the kit that makes the real jobs work.
The 6 tools you actually need
Here they are without any fuss. Below, we explain why each one earns its place and what to look for when you buy.
- Cordless drill/driver
- Claw hammer
- Screwdriver set
- Tape measure
- Spirit level
- Utility knife
1. Cordless drill/driver — the one tool that does everything
If you could only own one power tool, this is it. It drills pilot holes, drives screws, and handles the majority of fixing work for fencing, decking, raised beds, and interior builds. The headline battery voltage matters less than most people think. What actually matters is how it feels in your hand — balance, grip, and whether the clutch adjustment is easy to reach.
Pair it with good bits. Worn bits cam out and chew screw heads, which strips fixings and splits timber near board ends. Use pilot holes whenever you're working within 50mm of the end of any board — it's the single habit that prevents most split timber.
When you're doing outdoor work, your fixings matter as much as the drill. Keep your fencing fixings and postmix alongside your tools so you're not hunting for the right screws mid-job.
2. Claw hammer — still essential
A solid claw hammer covers nails, tapping timber into position, and pulling old fixings. The claw end earns its keep on demolition, pallet dismantling, and removing bent nails cleanly. Aim for something between 450g and 570g — heavy enough to drive nails in fewer strikes, light enough to use with control.
For outdoor work, keep a box of galvanised nails to hand. Galvanised nails resist corrosion significantly better than bright steel nails, and using rusty fixings from the bottom of an old tin is exactly how fence repairs fail within a season. See our nails range for the right options.
3. Screwdriver set — for where the drill can't go
A screwdriver set is still worth having even if you drill everything. You need it for final tightening, delicate gate furniture, anything requiring feel, and anywhere you want to avoid over-driving. Most stripped screw heads happen from the wrong driver size or working at an angle — a set with three or four common sizes (PH1, PH2, flat head) covers the vast majority of jobs.
4. Tape measure — where good DIY starts
Measuring errors cause more ruined timber than any tool misuse. A reliable tape with clear markings and a stiff blade that holds at extension is worth buying properly. Build one habit from the start: measure, mark, then check the mark before you cut. It takes five seconds and prevents the "I swear that was right" moment.
For timber projects, a 5m tape covers almost everything. If you're regularly working on longer runs — fencing, decking boards — go to 8m.
5. Spirit level — the difference between intentional and amateur
A spirit level turns "looks about right" into work that stays right. Use it on shelves, battens, gate posts, fence runs, and any horizontal surface where a slight lean becomes obvious once the job is done. A standard 600mm bubble level is fine for most domestic work. What matters is that you use it before you fix anything — not after.
6. Utility knife — the most-used tool in any shed
A sharp utility knife is underrated. It trims membrane and DPC, opens packs cleanly, scores sheet materials before snapping, and cuts felt, twine, and rope without a saw. Keep spare blades in the handle. A blunt blade is a dangerous blade — you push harder, lose control, and that's when slips happen. Change it before it struggles, not after.
The kit that's one step behind: what to add next
Once you have the core six and you're taking on consistent outdoor timber work, these are the natural next additions — in rough order of usefulness.
| Tool | When it earns its place | Priority |
|---|---|---|
| Pliers & adjustable spanner | Gate furniture, wire fencing, bolt fixings, tying off agricultural wire ends | High |
| Handsaw | On-site cuts when a power saw is overkill or unavailable | High |
| Circular saw | Regular straight cuts in boards, sheet materials, deck boards | Next buy |
| Jigsaw | Notches, curves, cut-outs, tight angles in timber | Next buy |
| Orbital sander | Finishing decking, smoothing raised bed sides, prepping for treatment | Next buy |
| Mitre saw | Repeatable angled cuts for framing, trim, or consistent runs | When volume justifies it |
PPE: non-negotiable before any of the above
PPE is not a grudging afterthought. It's the purchase that happens before the drill, not after. HSE guidance is clear on the minimum requirements when working with tools, timber, and cutting equipment:
- Eye protection (BS EN 166)
- Hearing protection (BS EN 352)
- Gloves for rough timber & wire
- Dust mask for cutting & sanding
- Sturdy footwear
HSE classifies hardwood dust as a carcinogen, and both softwood and hardwood dust are listed as respiratory sensitisers under COSHH. Carpenters and joiners are four times more likely to develop occupational asthma than the general UK working population. A basic FFP2 dust mask costs pennies compared to the alternative. Wear one every time you're cutting or sanding.
Buying quality without overbuying
The tools you use every day are worth spending on. A tape measure that bends at the hook, drill bits that round off after ten uses, or a spirit level that reads half a bubble out will cost you more in wasted materials and redone work than the upgrade ever would.
When you pick up any tool, check three things before you buy:
- How it feels in the hand — grip, balance, and weight distribution matter over a full day's work
- Build quality at the joints — no wobble where there shouldn't be wobble, no flex in the blade or body
- Availability of consumables — batteries, blades, bits. A drill that uses a discontinued battery platform is expensive to maintain
Buy fewer, better. A shed full of tools you avoid using because they're frustrating is not a shed full of tools.
Storing tools so they last
Organisation isn't about being tidy. It's about finding things fast and putting them away without effort — which is the only way habits stick.
Three things that work in most garages and sheds:
- Keep tools off the floor — damp rises, and tools left on concrete deteriorate faster than they should
- Store batteries separately in a dry spot — cold and damp shorten lithium battery life significantly in Welsh winters
- Group by job type — "fencing kit", "fixing kit", "measuring kit" means you grab what you need and go
The best-maintained sheds we see belong to people who store consumables with the tools they belong to. Nails in the same tub as the hammer. Bits clipped to the drill case. Timber fixings in a labelled tub next to the drill. It sounds obvious but it's the difference between a ten-minute job and a thirty-minute hunt.
Summary: the starter list
If you're building your first kit from scratch, this is the order:
- PPE — eye protection, hearing protection, dust mask, gloves. First purchase, always.
- Cordless drill/driver with a decent bit set
- Claw hammer with a box of galvanised nails
- Screwdriver set (PH1, PH2, flat)
- Tape measure (5m minimum)
- Spirit level (600mm)
- Utility knife with spare blades
From there, let your projects drive what comes next. When you're regularly cutting timber for fencing or landscaping builds, that's when a saw starts paying for itself. Build the kit around the work, not the other way round.
Ready to get started?
Browse our full range of timber fixings, nails, fencing hardware, and landscaping supplies — everything you need alongside your new tool kit, ready to order online or collect from our yard in Briton Ferry.
Shop Fixings & Hardware → Yes, we deliver — across Wales and the UK.Sources: HSE PPE guidance (hse.gov.uk/ppe); COSHH wood dust regulations; NHS/FirstAid.co.uk DIY injury hospitalisation data. PPE standards referenced: BS EN 166 (eye protection), BS EN 352 (hearing protection). Tool recommendations are general guidance only — always assess the specific requirements of your project and work environment.